Merchandise category pages
On this page
Category pages are listing pages. In ecommerce, category pages are also called product listing pages. You can have many categories, for example, on sale, new arrivals, brands, product types, or colors. With Algolia, you can build category pages by making an API request with an empty search query and an applied filter. See Category Pages for building category pages with Algolia.
To customize content for specific categories, brands, or pages, you can use Rules with filters in their conditions.
To use an attribute in a Rule condition with filters, you must first declare it in attributesForFaceting.
Category merchandising capabilities
To merchandise categories, you can use the Visual Editor or Manual Editor in the Algolia dashboard, or the API.
- The Visual Editor has the most visual way of configuring category merchandising but doesn’t offer all capabilities.
- The Manual Editor has more capabilities but offers a less visual merchandising experience. Both editors are built on top of the Rules API.
| Option | Capabilities |
|---|---|
| Visual Editor | • Pin and hide items • Boost, bury, and filter categories • Set priority on category ordering • Ban categories of items • Merchandise on filter selection • Merchandise based on date range, for time-limited promotions • Merchandise based on geolocation, device, and user segment • Configurable preview UI |
| Manual Editor | • Display banners • Merchandise on filter selection • Facet merchandising (facet type and value reordering) |
| Rules API | • Explore the Rules API • Build your own custom merchandising UI |
Configure the Visual Editor for category merchandising
You can only use the Visual Editor if you build your category pages with Algolia.
You can implement category pages by making an API request with an empty search query and a filter
for a category page identifier.
Before you can merchandise category pages with the Visual Editor, you need to configure your categories. To configure the Visual Editor for category merchandising:
-
Go to the Rules section in the Algolia dashboard. Select the index to which you want to add a Rule.
-
Select Create your first Rule and select Visual Editor.
-
In the It all starts here section, select Choose category page. The Merchandise & curate categories pane opens.
-
Click Configure to open the Set up display preferences dialog.
-
In the Category Page Identifier tab, select a facet as a category page identifier. You can only use searchable facets as category page identifiers.

-
Optional: click Add a category page identifier to add another attribute.
-
Optional: add a Custom subcategory separator if you’re using hierarchical categories. For example, for the hierarchical category:
Women / Coat / Raincoat, enter/as the custom separator. -
Save your changes.
If you want to add more categories later, you can open the Set up display preferences dialog from the top right corner of the Visual Editor.
Merchandise category pages with the Visual Editor
To merchandise category pages with the Visual Editor:
-
Configure the Visual Editor for category merchandising.
-
In the It all starts here section, select Choose category page. The Select the triggering category for the rule pane opens.
-
Select a category you want to merchandise. Click Apply. The Visual Editor displays the category page.
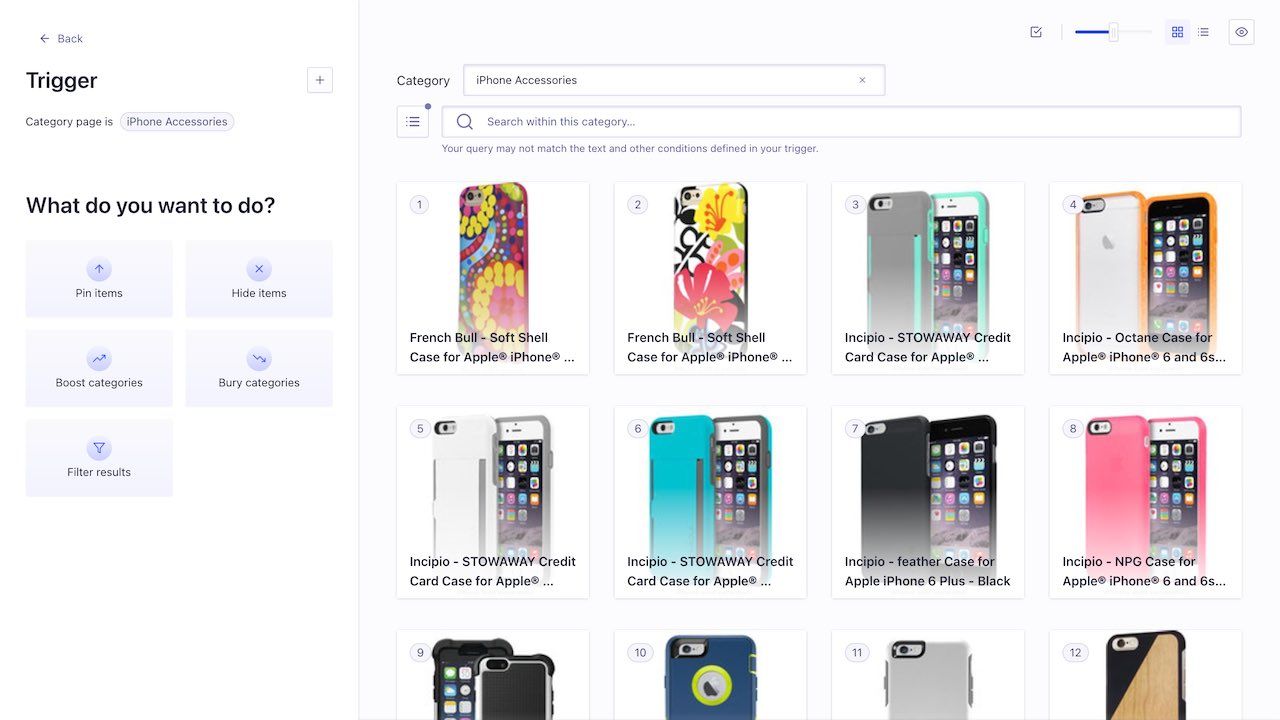
-
In the What do you want to do? section, select how you want to merchandise the category page. You can also drag items to a specific position directly in the Visual Editor.
-
Optional: add more conditions and consequences.
-
To add more triggering conditions, click the + icon in the Trigger section.
-
To add more merchandising actions, click the + icon in the Strategy section.
-
-
Save your changes.
-
Click Review and Publish to start merchandising the selected category page.
-
Click Save as draft if you don’t want the merchandising Rule to take effect yet.
-
Example: Display banners on category pages
You can’t use the Visual Editor to configure banners. Use the Manual Editor in the dashboard instead.
Displaying banners for category pages is similar to displaying banners for search results. The only change is that the Rule is triggered on a filter instead of a search query.
Add a Rule for returning custom data
-
Go to the Rules section in the Algolia dashboard. Select the index to which you want to add a Rule.
-
Select Create your first Rule or New Rule and select Manual Editor.
-
In the Condition(s) section:
- Toggle the Filters option on.
- Toggle the Query option off.
- In the Attribute name field, add your category page identifier, for example,
category. - In the Attribute value field, add the category for which you want to show a banner, for example,
Smartphone.
-
In the Consequence(s) section:
- Select Add consequence > Return Custom Data.
- In the input field, enter a JSON object, for example,
{ "banner": "iPhone" }. This JSON object is returned when the Rule is triggered.
-
Optional: enter a description that describes what the Rule does and enter a period during which the Rule is valid.
-
Save your changes.
Now, every time a user visits the “Smartphone” category page, the Rule is triggered and returns a JSON object as custom data. You can display the custom data in your UI as a banner.
Example: Promote items on category pages until users begin to search
The example in Display banners on category pages always shows a banner. To promote items on category pages only when users aren’t searching, you can create a Rule that’s triggered:
- When a user visits the “Smartphone” category page
- If the query is empty
Create a rule in the Visual Editor
-
Go to the Rules section in the Algolia dashboard. Select the index to which you want to add a Rule.
-
Select Create your first Rule or New Rule and select Visual Editor.
-
In the It all starts here section, click Set query condition(s). The Define the condition that triggers the rule pane opens:
- Toggle the Query option on.
- For Your Search, select Is and leave the text input empty.
- Toggle the Filters option on.
- Select a Filter name, for example,
category. - Select a Value, for example,
Smartphone. - Click Apply.
-
In the What do you want to do? section, select Pin items. The Choose items to pin pane opens:
- Under Pinned items, search for the item you want to pin and enter a number as the Position to which you want to pin the item.
- Optional: click Pin another item and repeat this step.
- Click Apply.
-
Save your changes.
- Click Review and Publish to start merchandising the selected category page.
- Click Save as draft if you don’t want the merchandising Rule to take effect yet.
Create a rule in the Manual Editor
-
Go to the Rules section in the Algolia dashboard. Select the index to which you want to add a Rule.
-
Select Create your first Rule or New Rule and select Manual Editor.
-
In the Condition(s) section:
- Make sure that the Query toggle is on.
- Select Is from the menu and leave the text input empty.
- Toggle the Filters option on.
- In the Attribute name field, select the category page identifier, for example,
category. - In the Attribute value field, select the category you want to merchandise, for example,
Smartphone.
-
In the Consequence(s) section:
- Click Add consequences > Pin an item.
- Search for an Item you want to pin and define its Position.
- Optional: click Add to pin more items.
-
Optional: enter a description that describes what the Rule does and enter a period during which the Rule is valid.
-
Save your changes.
