Importing with no-code connectors
On this page
Algolia’s no-code connectors allow you to send your data to Algolia without writing any code. To use a connector, define a data source, an Algolia destination, and a method for transferring data between them. To explore all the available connectors, visit the Connectors page in the Algolia dashboard.
Setting up a connector follows a similar process:
- Configure your data source
- Configure your destination (where you want the data to go)
- Configure your task (determine how you want that data transferred).
The process detailed below for the JSON connector is an example of how to set up one of these connectors.
Learn more about the no-code connectors in the Ingestion API reference documentation.
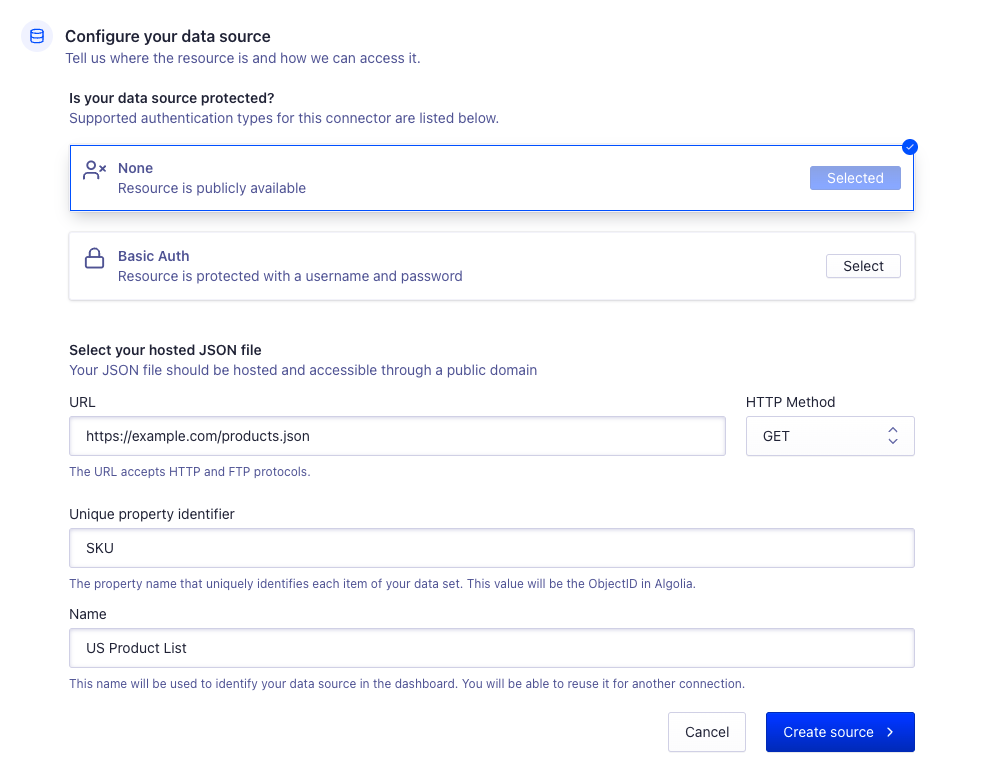
Configure your data source
- Visit the Connectors page to view the available options.
- Click the Connect button for the JSON connector. Then select Get started.
- Choose the appropriate authentication method based on your JSON file. The connector supports publicly available files and those protected with a username and password.
- Enter the FTP or HTTP URL for your JSON file. If your file is hosted on HTTP, select the appropriate HTTP method.
- Enter the name of the property that serves as a unique identifier for each record. This property is set as the
objectIDin Algolia. - Enter a name to identify this data source. This name should be easily recognizable and human-readable to aid its reuse in other areas of the connector platform.
- Click Create source to create a new data source and move to the next step.
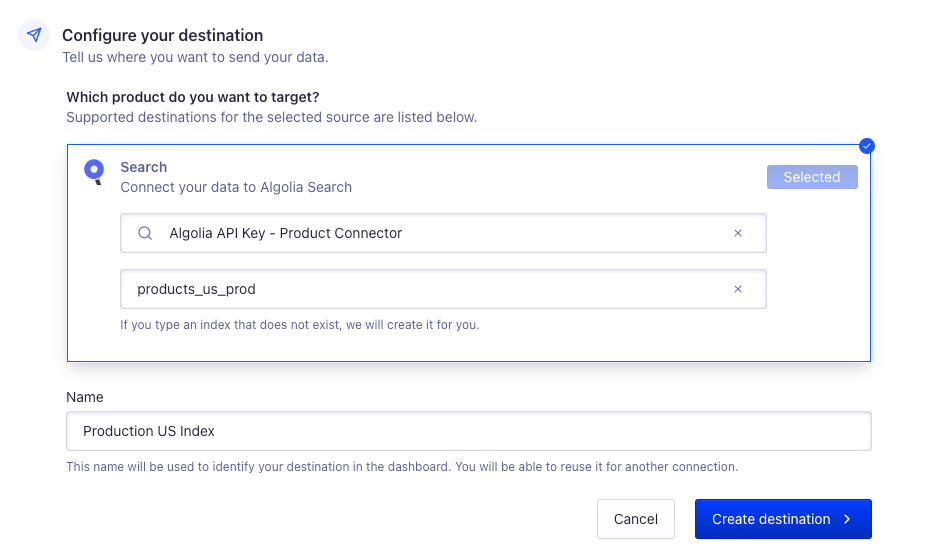
Configure your destination
The JSON connector supports sending data to an index.
- Create or select an Algolia API key to use with your index.
- Select an existing index or enter a name to create a new one.
- Enter a name to identify this destination. This name should be easily recognizable and human-readable to aid its reuse in other areas of the connector platform.
- Click Create destination to create a new destination and move to the final step.
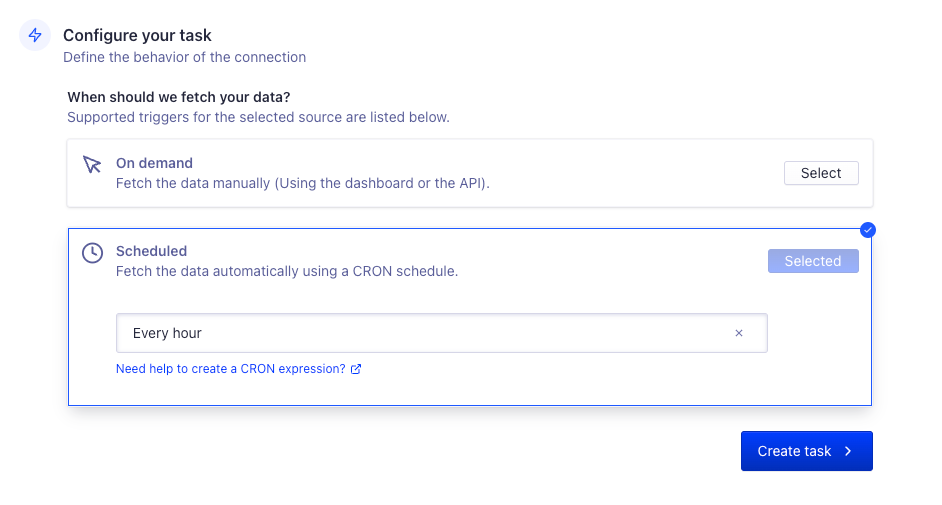
Configure your task
- Decide if you want your data fetched on a schedule or only on demand.
- If on a schedule, select an option from the drop-down menu’s list of popular schedules or enter a cron expression.
- Click Create task to create a new task.
Manage your task
After you’ve completed the preceding steps, the Tasks page will display the status of your task and allow you to manage it. From this page, you can allow the task to run, prevent it from running, delete it, or run it on demand.
A task will be automatically deactivated if it fails more than 5 times in a row, with a critical outcome reason. You can monitor runs in the Connector Debugger.
Connector specifications and requirements
JSON connector
The JSON connector expects a single array of JSON objects to be imported as records. Each record must have a unique identifier to be used as the Object ID in Algolia.
In this example, userID should be used as the unique identifier.
1
2
3
4
5
6
7
8
9
10
11
12
[
  {
    "userID": 1001,
    "firstName": "Marianne",
    "lastName": "Neal"
  },
  {
    "userID": 1002,
    "firstName": "Austin",
    "lastName": "Wolfe"
  }
]
CSV connector
The CSV connector expects a comma-separated values file where each row represents a record. Each row must have a unique identifier that Algolia uses as the Object ID.
1
2
3
userID,firstName,lastName
1001,Marianne,Neal
1002,Austin,Wolfe
Google BigQuery connector
To use Algolia’s Google BigQuery connector, you must have a Google service account with the following permissions for the table you want to connect to:
1
2
3
4
5
6
7
8
9
10
11
12
13
14
15
16
bigquery.datasets.get
bigquery.datasets.getIamPolicy
bigquery.jobs.create
bigquery.models.export
bigquery.models.getData
bigquery.models.getMetadata
bigquery.models.list
bigquery.routines.get
bigquery.routines.list
bigquery.tables.createSnapshot
bigquery.tables.export
bigquery.tables.get
bigquery.tables.getData
bigquery.tables.getIamPolicy
bigquery.tables.list
resourcemanager.projects.get
The connector will import your selected table by default. If you want to use a custom SQL statement to change the imported data, replace your table name with %s, for example:
1
SELECT * FROM %s WHERE Status="Available"
Each row in your table must have a unique identifier. Algolia uses this as the Object ID.
To ensure you don’t exceed your BigQuery quota, don’t schedule data extracts to run more frequently than once a day.
Authentication
Protected data sources and destinations can also include authentication credentials. This information can be stored as a reusable object and used with multiple data sources and destinations. For example, the JSON connector can connect to files protected by a username and password.
Your Algolia index requires an API key for ingesting data
and ensuring this API key has the correct scopes is essential.
For the no-code connectors, the API should have the following permissions: addObject, deleteIndex, and editSettings.
You can find and manage your credentials on the Authentications tab in the Connectors page of the Algolia dashboard.
