Recommendations can make or break an online shopping experience. In a world full of endless choices and infinite scrolling, recommendations allow customers to cut through the noise to discover new things they’re more likely to love. They can also help customers learn new things about new areas of shopping — whether it’s searching for the perfect gift or buying something new, recommendation-based features such as Trending Products sections can help users make the most of their time online.
For developers looking to add these important features to their e-commerce experience, Algolia Recommend can be the superhero that saves the day. Read on to learn how to leverage Algolia Recommend along with the Insights API to surface trending products and supercharge your e-commerce application!
What we’re building
In this article, we’ll be working on an e-commerce application using React and Commerce.js. Luckily, we won’t have to build from scratch — we’ll be using this basic e-commerce application initially developed for Algolia DevCon as our starting point.
On completion of the tutorial, our application will be able to recommend trending products on an individual product detail page using Algolia’s InstantSearch insights library, the Insights API, and Algolia Recommend.
If you’d like to view the full project’s code ahead of time, you can visit the [algolia-commercejs-recommendations-app repository](https://github.com/hello-ashleyintech/algolia-commercejs-recommendations-app).
Remember also that even though this article is geared towards React and Commerce.js, it still serves as a general-purpose guide for extending any e-commerce app with Algolia Recommend. If you have more specific questions around implementing Recommend in a different context, the docs will have the information you’re looking for.
Getting Started
Before we get started building, make sure you set up the following:
Node: To check if you have Node installed already, you can run node -v in your command line. If no version pops up, you’ll need to install it — you can find installation directions for your machine here.
Chec: Commerce.js uses a platform called Chec to manage your integrations, API Keys, and products. You’ll need to create an account here and then set up a Commerce.js store.
Algolia: To leverage Algolia’s features, you’ll need to create an Algolia account here. You’ll also need to create an application to represent your e-commerce application and then create an index called products.
ngrok: Create an ngrok account here. You’ll need it to tunnel connections from your local apps so that you can configure webhooks and make API calls.
When all of the above is ready to go, clone the base project, algolia-commercejs-app’s GitHub repository, to your machine. Then, follow the instructions in this README to complete setting up your application for this tutorial (make sure you set up .env files with all environment variables in the .env.example for both the client and server directories).
Once you have an e-commerce store running locally that is successfully displaying your products and running the chatbot, you can proceed to the next step!
Let’s Build!
Now that the base application is set up, let’s get started with building! 🔨
Add in routing and a product detail page
To start with tracking what’s trending, we’ll need to set up page routing and a component that surfaces a product’s detail page upon clicking it from the home screen.
Create a ProductIndividual component
To start, we’ll need a new component that will surface a product’s details. In your code editor of choice, create a new component, ProductIndividual, by adding a new file, ProductIndividual.js, to the client/src/components directory:
// client/src/components/ProductIndividual.js
import React from "react";

function ProductIndividual() {
  return (
    <></>
  );
}

export default ProductIndividual;
You might notice the file is pretty bare right now — the component will be empty until we’re able to pass individual product data into it from the ProductList. This will be possible once we configure routes to link between the main page and product detail pages.
In the client/src/components directory, you can also create a corresponding CSS file for the ProductIndividual component titled ProductIndividual.css. Since there is nothing being rendered in the component, this CSS file can be left blank for now. You can import the new CSS file in your ProductIndividual.js file by adding the following line under the existing import statement:
import "./ProductIndividual.css";
Set up React Router
In order to route to different pages, we’ll be using React Router, which allows us to seamlessly create URL routes with different views. To get started, we’ll need to install the react-router-dom package. Run the following command in your project’s client directory to only install the package on the front-end:
npm i react-router-dom
Once the package has been installed, we can start adding routes to our application, including one that points to the ProductIndividual component we just added. To do so, go to client/src/App.js and add the following import statements to the top of the file:
import { BrowserRouter as Router, Routes, Route } from "react-router-dom";
import ProductIndividual from "./components/ProductIndividual";
Now that react-router-dom has been imported, we can use its functionality to wire up URL routes to different views consisting of various components. Within the App() function, update the return() so that it only contains the following code:
The above code initializes two routes, / and /products/:id:
The / route renders a home page view of all of the products available to a user as well as the Chat Bot widget that existed in the base app.
The /products/:id route will render the newly added ProductIndividual component along with the Chat Bot widget that existed in the base app. The :id in this route represents the selected product’s ID, which allows a differentiation of routes across all the various product detail pages.
Make NavBar icon clickable
Now that we have our routes set up, we can configure our brand icon in the nav bar to link back to the home page. This will be extremely useful for when we’re diving into building on the product detail page, since it’ll give us a simple pathway back to the home page.
Head to client/src/components/NavBar.js and add the following import statement:
import { Link } from "react-router-dom";
This imports a Link component from the react-router-dom package. The [Link component](https://reactrouter.com/en/main/components/link) allows us to make components, text, and other elements linkable to the routes initialized by React Router in App.js.
To make the logo component, <Logo>, linkable in the nav bar, you’d wrap it in the <Link> tag, like so:
<Link to={"/"}>
  <Logo className="logo" />
</Link>
We’re passing in a to property to the Link component, which will specify what route the app will redirect to when the component(s) within the <Link> tag are clicked on. In this case, the to property is the route to the home page (/).
Once that has been added in, clicking your nav bar’s logo will now route you back to the home page!
Set up home page products to link to product details
Now that we have experience with linking components so that they redirect to specific routes, we can get to work to make every product on the home page clickable!
Each product on the home page is rendered through the ProductsList component, where an array of products that have been queried from Commerce.js have been passed in as a prop. Within the ProductsList component, the array of products is iterated through to render individual ProductItem components that display each product and its related information.
In ProductsList, we can wrap the ProductItem rendered for each product in a <Link> tag so that products navigate to tan individual product page.
To get started with this, import the Link component in client/src/components/ProductsList.js:
import { Link } from "react-router-dom";
Then, in the same file, wrap the ProductItem component being rendered in each iteration of the products.map() statement in a <Link> tag:
In the <Link> tag, we’re passing in two props this time:
A to property, which specifies what route to redirect to. For the to property, we are passing in the product’s ID in place of the :id portion of the route, which ensures that the user is linked to a specific product page with a custom view of the product.
A state property, which allows the passing of information to components rendered in the route that the Link component redirects to. For the state property, we are passing in the product information, which will be accessible though a selectedProduct property.
Spruce up your product details page
Now that users have a way to access the ProductIndividual component from the home page, we can update it to surface information that is passed to it from the Link component added in ProductsList.
In client/src/components/ProductIndividual.js, add in the following import:
import { useLocation } from "react-router-dom";
The above statement imports a [useLocation hook](https://reactrouter.com/en/main/hooks/use-location) from the react-router-dom library. useLocation allows you to access a location object detailing information about the current URL you’re on and information passed in to get there. This information includes the state property passed in from ProductsList. state contains a selectedProduct property with all of a product’s information that is retrieved from Commerce.js.
Let’s begin with using the useLocation hook! At the top of the ProductIndividual()‘s function body in ProductIndividual.js, add in the following lines of code:
The above code will grab the location object through the useLocation hook. Then, using that object, the selected product’s information is populated from that object into selectedProduct.
We can now use the selectedProduct from the location object to surface a specific set of information related to the product (since we’re aiming for a very simple product detail page, we’ll only surface an image, a name, and a formatted price). Update the return() in ProductIndividual component so it looks like this:
Finally, to update the styling for the ProductIndividual component’s newly added information and make it a little prettier, add in the CSS from the ProductIndividual.css file to your project’s ProductIndividual.css file.
At this point, your application should now be able to:
Surface individual product details page from the home page
Enable users to navigate back to the home page from the product detail page using the store logo in the nav bar
Add in event tracking
Wonderful news — at this point, users can access individual product detail pages in your app! 🎉With this functionality added, we can start tracking user interactions to see what’s trending. for our app, we’ll consider a “trending item” one that is interacted with consistently by users.
Since our application doesn’t include any interactions beyond clicking on products, we’ll be logging a conversion event to Algolia each time someone clicks on an item and is navigated to the product’s detail page. Typically, if our application had more features, we would likely use an “add to cart” button interaction as a conversion event instead. You can learn more about events and sending events to Algolia here.
Set up InstantSearch
We’ll need to install three packages from Algolia to help us achieve our desired goal of logging conversion events based on user clicks. The packages are algoliasearch, react-instantsearch-dom, and search-insights.
You can install them all at once in your project’s client directory using the following command:
npm i algoliasearch react-instantsearch-dom search-insights
In order to track user interactions, we’ll need to set up InstantSearch, an open source UI library that enables various search capabilities, including the ability for Algolia tracking components to be embedded within its implementation.
Start by adding the following import statements into client/src/App.js:
import aa from 'search-insights';
import algoliasearch from 'algoliasearch';
import { InstantSearch, Configure } from 'react-instantsearch-dom';
Next, add the following at the top of your App() function declaration:
The above initializes a search client through Algolia Search that we can pass into Algolia’s InstantSearch component as well as a search insights instance that will help log user interactions.
Next, we’ll wrap each route’s components in an InstantSearch component and also add in a Configure component that specifically enables the tracking of clicks within that InstantSearch instance. In the return() statement in your App.js, replace the code within the <Routes> tag with the following:
Each route’s components are wrapped with an InstantSearch wrapper which takes in the searchClient initialized from algoliasearch. Additionally, it takes in an indexName that corresponds to the Algolia index your products are synced to — in this case, it’s products.
Add an event to log insights
Now everything has been configured, we can start tracking conversion events for products on the home page. Update the code in the client/src/components/ProductsList.js file so it looks like the following:
import React from "react";
import { Link } from "react-router-dom";
import PropTypes from "prop-types";
import ProductItem from "./ProductItem";
import "./ProductsList.css";
import aa from "search-insights";
import { connectHitInsights } from "react-instantsearch-dom";

function Product({ products }) {
  return (
    <div className="products" id="products">
      {products.map((product) => (
        <Link
          to={`/products/${product.id}`}
          state={{ selectedProduct: product }}
          key={product.id}
          onClick={() => {
            aa("convertedObjectIDs", {
              userToken: "user-1",
              index: "products",
              eventName: "Product conversion",
              objectIDs: [product.id],
            });
          }}
        >
          <ProductItem product={product} />
        </Link>
      ))}
    </div>
  );
}

Product.propTypes = {
  products: PropTypes.array,
};

const ProductsList = connectHitInsights(aa)(Product);
export default ProductsList;
We’ve made a few updates here:
aa and connectHitInsights have been added as imports.
The component’s functional declaration, ProductsList(), has been renamed to Product() — this is so we can connect the component’s declaration to Algolia’s Insights API later on in the file using the connectHitInsights() function, which will then be stored and exported as the ProductsList component. This is accomplished in the following line of code at the end of the file:
Due to this change, ProductsList has also been swapped out for Product when pulling the propTypes below the Product() component initialization.
The Link component has an onClick() listener added. Since we are considering user clicks on products as conversions, the onClick() listener will use aa from the search-insights library to log a [convertedObjectIDs event](https://www.algolia.com/doc/api-reference/api-methods/converted-object-ids/) every time a user clicks on a product. The aa event logging also requires a few other parameters:
A userToken, which we are hard-coding as user-1. This is intended to be a unique user ID — if you are using separate user accounts for your application, you’d retrieve the current user’s ID and populate it here.
An index, which is the corresponding Algolia index where our products are listed — in this case, it’s products.
An eventName — this can be anything you want.
objectIDs — this is an array of products that were interacted with for this event. Since our application is logging one event per one product click, we’ll always have only one product ID being passed in.
Confirm events are being sent to Algolia
At this point, all of the setup to send a conversion event to Algolia has been added. But…where do these events end up? How do we know if all the heavy lifting was worth it?
The answer is very simple — you can dive into the Events section in the Algolia dashboard! This section is comprised of two parts:
The Events Hub, which will display a dashboard of all events being sent to Algolia over the past 7 days:
The Events Debugger, which shows a detailed, event-by-event breakdown of events as they come in:
You’ll know your events are being sent successfully when you see them appear on the Algolia side with a 200 status code. To learn more about debugging and validating events, you can visit this article.
The final frontier: surface trending product recommendations
At this point, you’re successfully sending conversion events from your app’s users to Algolia. Now that you have all of this beautiful data, what should you do with it?
Introducing Algolia Recommend — an easy-to-use Algolia feature that takes event data, trains machine learning models to recognize desired patterns in that data, and then surfaces information for you to easily surface on your site!
While this might sound complicated, Algolia makes it incredibly easy — all you need to do is collect events and submit a form, then they do the rest. However, make sure you’re collecting the right type of events for the Recommend model you want to use. You can view requirements for each model type here.
Generate a Recommend model
For this specific tutorial, we will be generating a Recommend model for “Trend Recommendations”, which requires a minimum of 500 conversion events for a specific index over the course of 3 days. To get the data you need, you can either pause here for now and let your app organically generate those events, or we can take a shortcut and generate a CSV of event data. Just for the purpose of testing this tutorial, we created a fake CSV with columns named userToken, timestamp, objectID, eventType, and eventName. Then, we generated 3 different timestamps for 3 different days, filled the timestamps column with those timestamps, and added in random objectIDs for products in our index.
Once you have your data, head to the Recommend models page in your dashboard and select the “Trends Recommendations” option. For your Data Source, select the index you’ve been using to store your items for your e-commerce store.
In the second step, add in your data. If you have generated 500 conversion events over 3 days manually, you can skip this step unless you have any events that have been logged to other indexes aside from what you chose as your Data Source. If you have created a CSV with all of your event data, you’ll upload it at this step using the “Upload CSV” button.
Next, make sure the “Trending items” option is selected. Then, you can click the “Start training” button. Your Recommend model will start training — it can take anywhere from a few minutes to several hours depending on what data you have. You’ll know your model is done training when you see something similar to this on the model’s page:
If you run into any issues or your model fails, you may need to examine your data and the data criteria the model requires to make sure everything is working as expected. Once you make any needed changes, you can always submit the model with the new data to re-train it. You can view a full how-to guide for setting up Algolia Recommendations here.
Surface trending items on your app
Once your model has been trained, you can pull those generated recommendations into your app. Algolia makes this a straightforward process through two libraries: @algolia/recommend-react and @algolia/recommend. Install both of them in your project’s client directory:
npm i @algolia/recommend-react @algolia/recommend
To surface recommendations, we’ll create a new component that will pull data from our Trending Items model and then render it in the UI.
In client/src/components, create a file called RecommendationCard.js. This will be for a RecommendationCard component, a simple component similar to the ProductIndividual component that will take in data about a product as a prop and surface specific information on it:
Once RecommendationCard has been added, create a Recommendations.js file in client/src/components, which will be for a general Recommendations component that contains RecommendationCards for each trending item being sent from Algolia:
This component uses a useTrendingItems hook from Algolia to query for results of the Trending Items model we’ve generated. useTrendingItems requires a recommendClient to be passed in, which is initialized using the @algolia/recommend library’s recommend function.
Similarly to ProductsList, this component then iterates through the array of recommendations Algolia returns and renders a RecommendationCard that surfaces each individual product’s data. The RecommendationCard is wrapped in a Link component that will route users to the product page of selected recommendations and also log a conversion event through an onClick() listener.
When you’re ready to surface your recommendations on your product detail pages, hop into client/src/components/ProductIndividual.js and import your Recommendations component:
import Recommendations from "./Recommendations";
Then, add the component in before the </> closing tag in your component’s return():
<Recommendations />
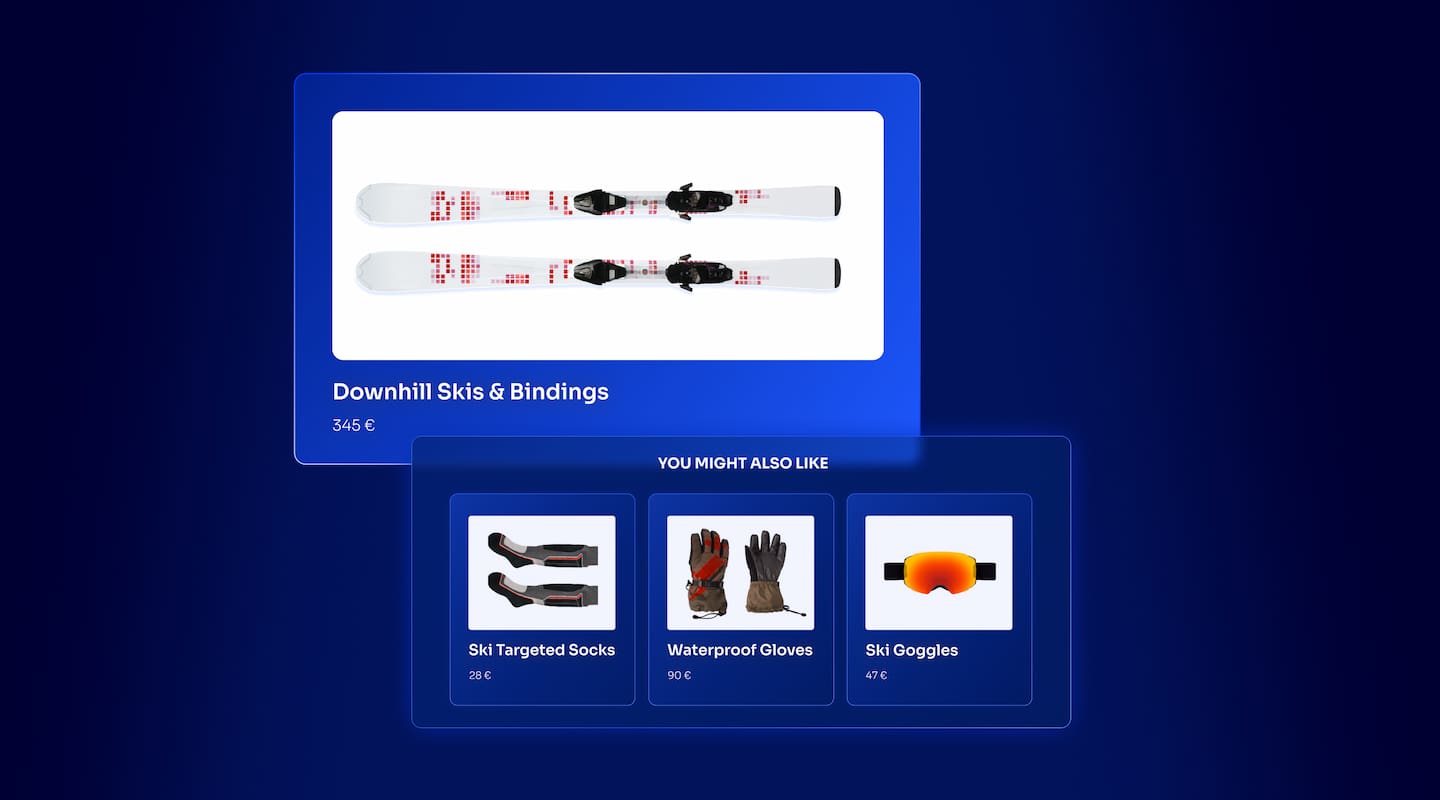
At this point, the Recommendations component should be surfacing on your product detail pages, but it might look a little funny. If you’d like to add some easy styling for this component so that it looks like the page below, create Recommendations and RecommendationCard CSS files in the client/src/components directory. From there, you can copy over contents of our [Recommendations CSS file](https://github.com/hello-ashleyintech/algolia-commercejs-recommendations-app/blob/master/client/src/components/Recommendations.css) and [RecommendationCard CSS file](https://github.com/hello-ashleyintech/algolia-commercejs-recommendations-app/blob/master/client/src/components/RecommendationCard.css) to your local components.
Conclusion
Congratulations! 🥳 You’ve created a nifty e-commerce app that allows you to surface Trending Products based on real user trends! You can view the full project’s GitHub repository here. Typically, this type of functionality would take days of coding and quite a bit of machine learning knowledge. However, with the magic of Algolia, you’ve saved yourself time and many frustrated Google searches on training a machine learning model from scratch. ✨
As you learned in this tutorial, Algolia Recommend is a powerful tool that can help make a customer’s e-commerce experience more helpful and more personal. If you’re interested in expanding further on the app we built today, feel free to take a look at other types of models and the types of data required for them here and explore ways you can add more personalized experiences for your customers with Algolia. Additionally, stay tuned for another tutorial coming soon on how to implement personalized search results for your e-commerce app! 🎉